
Raspberry Pi Arcade Table Nearly Finished

This is how it looks now, not too shabby eh?
I spent a chunk of today finishing off my Raspberry Pi powered tabletop game machine. Because I swapped monitors I had to rework the monitor support but fortunately the size and shape of the hole in the surface was the same.
I did have all kinds of plans to rework the joysticks, but I’ve changed my mind (mainly because I’m lazy) and so I’ll keep it like this for a while.
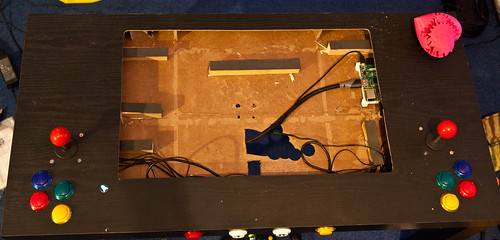
This is the work in progress. I covered the wooden parts with foam plastic to make a better support. I’ve found that my favourite fool suppliers (www.toolstation.com) also sell 0.5M HDMI cables which made it much easier to fit the monitor. You can just see the Raspberry Pi on the top right hand side, the USB hub and the joystick interface are under the front panel. Since I took this picture I dismantled a pair of USB powered speakers and put the drive units and amplifier under the screen as well. Here is a parts list of sorts:
- Argos Value range Black coffee table
- Raspberry Pi processor
- Ultracabs Joystick and USB interface set
- LG IPS 22 inch monitor
- 7 port USB Powered Hub
- Extra long cable USB Power supply
- Wireless Keyboard and Trackpad
- Powered USB speakers (not the best, could really do with something louder)
- Hole saw set (perfect for drilling the holes for the joysticks, buttons and speakers)
- 0.5M HDMI cable
The only thing left to buy now is the glass which I’ll have to get cut to cover the monitor. I also need to tidy up the wiring. One of the nice things about this design is that all the voltages actually in the table are low ones. These are the things that I’ve learned from the exercise:
- Test the monitor angle of view before you buy it. Don’t assume that it will work.
- Think about how the joystick and buttons are to be arranged, and how you see the device being used.
- Cutting the surface is easy, but watch out for metal staples that connect the surface to the wooden bracing inside. You can actually do the cutting of the top and bottom panels with a craft knife if you are careful.
- You have to cut a hole in the bottom of the table and push the joysticks up through it. Removing the shaft and trying to slide the joysticks in between the top and bottom is pretty much impossible. I took off the metal mounting bracket and screwed the joysticks directly to the surface, otherwise there was not quite enough clearance for them inside the table
- Making physical things is quite a bit harder than writing software (at least for me) but very satisfying
 Rob
Rob
Reader Comments (4)
This is a great project i am trying to do the same thing. I have bought the same joysticks with the USB interface but i am having issues with a some of the buttons working i was wondering is you can across any similar issues.
I have made up a controller with a joystick and 8 buttons but only a couple of the buttons are working.
I have plugged it into my laptop and everything is working correctly so i know its not the wiring.
If you have any ideas that would be great.
Many Thanks
Gary
Do you also know what version of mame you are on?
thank you for any replies